HiPi::Interface::EPaper
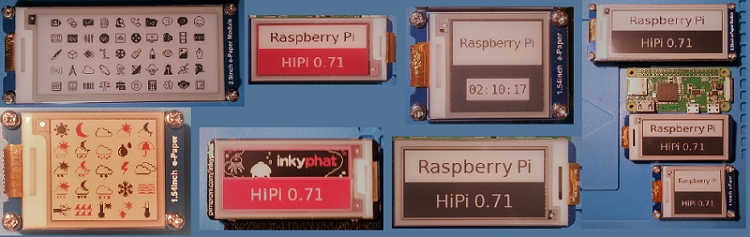
This module provides an interface to several small form factor E-Paper / E-Ink displays.
 |
It uses HiPi::Device::SPI as a backend.
Currently supported displays are:
- Waveshare 1.54 inch yellow, black, white ( 152 x 152 )
- Waveshare 1.54 inch red, black, white ( 200 x 200 )
- Waveshare 1.54 inch black, white ( 200 x 200 with partial update )
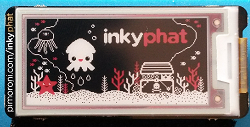
- Pimoroni Inky pHAT red, black,white ( 212 x 104 )
- Waveshare 2.13 inch red, black, white ( 212 x 104 )
- Waveshare 2.13 inch black, white ( 250 x 122 with partial update)
- Waveshare 2.9 inch red, black, white ( 296 x 128 )
- Waveshare 2.9 inch black, white ( 296 x 128 with partial update)
IMPORTANT: Using incorrect setup and update parameters with E-Paper displays can cause permanent damage to the display. You use the modules at your own risk. I have spent considerable time, offort and testing to ensure that the modules follow the manufacturer / suppliers example code and datasheet specifications. However, I cannot guarantee that I have done this correctly and the code may still damage your display.
The module only supports display types that have been available for testing during development.
If you are not familiar with E-Paper displays and their limitations, please read the E-Paper Display Notes first.
Examples
Methods
- new
- display_reset
- display_update
- display_sleep
- set_update_mode
- display_partial_update
- create_partial_context
- clear_buffer
- set_pen
- invert_pen
- logical_width
- logical_height
- create_context
- draw_arc
- draw_bit_array
- draw_circle
- draw_context
- draw_ellipse
- draw_line
- draw_pixel
- draw_polygon
- draw_rectangle
- draw_rounded_rectangle
- draw_text
- get_text_extents
- draw_logo
Creates a new instance of the module class
use HiPi qw( :epaper );
use HiPi::Interface::EPaper;
my $epd = HiPi::Interface::EPaper->new(
    type => EPD_WS_2_13_250_X_122_A
);
Constants are provided for each type of display that the module supports.
- EPD_WS_1_54_200_X_200_A (Waveshare 1.54 inch black, white with partial update)
- EPD_WS_1_54_200_X_200_B (Waveshare 1.54 inch red, black, white)
- EPD_WS_1_54_152_X_152_C (Waveshare 1.54 inch yellow, black, white)
- EPD_WS_2_13_250_X_122_A (Waveshare 2.13 inch black, white with partial update)
- EPD_WS_2_13_212_X_104_B (Waveshare 2.13 inch red, black, white)
- EPD_PIMORONI_INKY_PHAT_V2 (Pimoroni Inky pHAT red, black, white)
- EPD_WS_2_90_296_X_128_A (Waveshare 2.9 inch black, white with partial update)
- EPD_WS_2_90_296_X_128_B (Waveshare 2.9 inch red, black, white)
IMPORTANT: You must use the correct type for your display in the constructor. Passing the wrong type may permanently damage your display. Be careful!
Rotation
In all of the supported displays the width or x axis is always the shorter dimension. For example, the Waveshare 2.9 inch displays have a width of 128 pixels and a height of 296 pixels.
For most applications of these small form factor wide displays the logical width in the application is the longer dimension. To change the orientation of the display pass the required rotation in the constructor.
Constants are provided to define the rotation required.
- EPD_ROTATION_0
- EPD_ROTATION_90
- EPD_ROTATION_180
- EPD_ROTATION_270
The default rotation for 'long' or 'wide' displays is EPD_ROTATION_90. For square displays it is EPD_ROTATION_0
Passing a rotation that does not match your drawing code is harmless. Attempting to draw to pixels outside the display area is ignored. Use rotation to orient your display according to its mounting in your project.
use HiPi qw( :epaper );
use HiPi::Interface::EPaper;
my $epd = HiPi::Interface::EPaper->new(
    type     => EPD_WS_2_13_250_X_122_A,
    rotation => EPD_ROTATION_270
);
SPI Interface and Pin Settings
Each of the supported display types has default settings that use CE0 of the SPI0 device. (Only the MOSI, SCLK and CEO pins from the Pi are connected - the displays are write only so the MISO pin is unconnected).
The displays also use three additional pins for DC, RESET and BUSY functions.
Waveshare Display Defaults
| DC PIN | GPIO 25 | RPI PIN 22 | |||
| RESET PIN | GPIO 17 | RPI PIN 11 | |||
| BUSY PIN | GPIO 24 | RPI PIN 18 |
Pimoroni Inky pHAT Defaults
| DC PIN | GPIO 22 | RPI PIN 15 | |||
| RESET PIN | GPIO 27 | RPI PIN 13 | |||
| BUSY PIN | GPIO 17 | RPI PIN 11 |
If you connect your display differently you can override the defaults in the constructor.
use HiPi qw( :epaper :rpi );
use HiPi::Interface::EPaper;
my $epd = HiPi::Interface::EPaper->new(
    type       => EPD_WS_2_13_250_X_122_A,
    devicename => '/dev/spidev0.1',
    dc_pin     => RPI_PIN_38,
    reset_pin  => RPI_PIN_40,
    busy_pin   => RPI_PIN_36,
);
The modules reset your display automatically when initialised. You can also reset the display in your own code. Note that this doesn't clear your local buffer containing your current bitmap. To clear that call clear_buffer
$epd->display_reset()
All drawing methods store data in a buffer. They are not written to the display until you call display_update.
The method uses the current update mode as set by set_update_mode( $mode ). By default and always on displays that do not support partial update, the current mode is EPD_UPD_MODE_FULL (full).
In the default full update mode the displays take some time to refresh and will flicker. The refresh time varies between 2 and 30 seconds depending on the display type.If the current mode is EPD_UPD_MODE_PARTIAL, a partial update is used against the whole of the display area.
$epd->display_update()
The manufacturers recommendation for E-Paper displays is that they are placed into sleep or power-off mode between refreshes. You should therefore ensure that your code calls display_sleep after each refresh or before your code exits.
Once display_sleep has been called, display_reset() must be called before the display will accept any other commands.
While in sleep mode the module will not maintain the state of the busy pin.
$epd->display_sleep()
This method sets the current update mode for displays that support partial updates.
Available constants for mode are:
- EPD_UPD_MODE_FULL (default)
- EPD_UPD_MODE_PARTIAL
use HiPi qw( :epaper );
use HiPi::Interface::EPaper;
my $epd = HiPi::Interface::EPaper->new(
    type              => EPD_WS_2_13_250_X_122_A,
    skip_sleep_onexit => 1,
);

# want to do partial update on an area 80 pixels
# wide by 24 pixels high in the centre of this display

# do initial drawing
.....
$epd->display_update;
# now set partial mode
$epd->set_update_mode( EPD_UPD_MODE_PARTIAL );
# first update the whole display with a partial update
$epd->display_update;

my $pctx = $epd->create_partial_context( 80, 40 );
$pctx->draw_text(0,0, 'Raspberry Pi', 'SansEPD15');

# update the partial area at x = 85, y = 41
$epd->display_update_partial( 85, 41, $pctx);
See also: Partial Update Example
For displays that support partial updates, update the area of the display at top left logical coordinate $x, $y using partial context $context.
To perform a partial update, create a HiPi::Interface::EPaper::PartialContext using the create_partial_context method. Write to the PartialContext, and update the display with the partial context.
my $part_ctx = $epd->create_partial_context( $width, $height );
# draw to partial context
.......
# write partial update to display
$epd->display_partial_update( $x, $y, $part_ctx );
The currently supported display types that allow partial updates are:
- EPD_WS_1_54_200_X_200_A (Waveshare 1.54 inch black, white with partial update)
- EPD_WS_2_13_250_X_122_A (Waveshare 2.13 inch black, white with partial update)
- EPD_WS_2_90_296_X_128_A (Waveshare 2.9 inch black, white with partial update)
See also: Partial Update Example
HiPi::Interface::EPaper supports partial updates using the HiPi::Interface::EPaper::PartialContext class. The create_partial_context method returns a new instance of this class.
The $width and $height parameters define the size of the partial context. Partial updates use byte boundaries to define the area to update so the $width and $height parameters should be muliples of 8 pixels. If they are not, the size of the partial context will be extended so that its logical width and logical height are multiples of 8 pixels.
use HiPi qw( :epaper );
use HiPi::Interface::EPaper;
my $epd = HiPi::Interface::EPaper->new(
    type              => EPD_WS_2_13_250_X_122_A,
    skip_sleep_onexit => 1,
);

# want to do partial update on an area 80 pixels
# wide by 24 pixels high in the centre of this display

# do initial drawing
.....
$epd->display_update;
# now set partial mode
$epd->set_update_mode( EPD_UPD_MODE_PARTIAL );
# first update the whole display with a partial update
$epd->display_update;

my $pctx = $epd->create_partial_context( 80, 40 );
$pctx->draw_text(0,0, 'Raspberry Pi', 'SansEPD15');

# update the partial area at x = 85, y = 41
$epd->display_update_partial( 85, 41, $pctx);
See also: Partial Update Example
The module writes all drawing operations to a local buffer that you write to the display using display_update. You can clear all pixels set in the buffer using clear_buffer.
$epd->clear_buffer();
# optionally send to display
$epd->display_update()
Where displays support a colour in addition to black, you set the colour for all drawing operations using the set_pen() method.
use HiPi qw( :epaper );
...

$epd->set_pen( EPD_BLACK_PEN );
$epd->draw_text(0,0, 'This is black text', 'SansEPD15');
$epd->set_pen( EPD_RED_PEN );
$epd->draw_text(0,20, 'This is red text', 'SansEPD15');
The module provides the following constants
- EPD_BLACK_PEN
- the following are all equivalent for the alternate colour in a tri colour display but all are provided for convenience
- EPD_RED_PEN
- EPD_YELLOW_PEN
- EPD_COLOUR_PEN
- EPD_COLOR_PEN
Where a display only supports black / white specifying EPD_RED_PEN or equivalent has no effect.
Set invert_pen to set pixels you write using the drawing methods to 'off' rather than on. This is useful to draw items as 'off' over areas you may have previously set 'on'
# draw a filled rectangle
$epd->draw_rectangle(10,20, 60, 40, 1);
$epd->invert_pen(1);
# write some text over the rectangle
$epd->draw_text(12, 25, 'Hello World', 'SansEPD15');
# restore normal pen
$epd->invert_pen(0);
Returns the logical width. All drawing methods use logical coordinates. logical_width returns the width of the drawing area adjusted for its rotation.
For example, if using a 296 x 128 display
| rotation | logical width | ||
| EPD_ROTATION_0 | 128 | ||
| EPD_ROTATION_90 | 296 | ||
| EPD_ROTATION_180 | 128 | ||
| EPD_ROTATION_270 | 296 |
my $width = $epd->logical_width;
Returns the logical height. All drawing methods use logical coordinates. logical_height returns the height of the drawing area adjusted for its rotation.
For example, if using a 296 x 128 display
| rotation | logical height | ||
| EPD_ROTATION_0 | 296 | ||
| EPD_ROTATION_90 | 128 | ||
| EPD_ROTATION_180 | 296 | ||
| EPD_ROTATION_270 | 128 |
my $height = $epd->logical_height;
Instead of writing to the buffer directly, you can use drawing methods on a HiPi::Graphics::DrawingContext which can then be written to the buffer using draw_context.
You can draw the same context on the buffer many times. You can rotate all the pixels in a context as you write it to the buffer.
my $ctx = $epd->create_context();
$ctx->draw_text(0,0,'Hello World'. 'SansEPD15');
# write it to the buffer at position 10,20 and rotate it 90 degrees.
$epd->draw_context( 10, 20, $ctx->rotated_context( 90, 0, 0) );
# write it to the buffer at position 100,30 and rotate it 180 degrees.
$epd->draw_context( 100, 30, $ctx->rotated_context( 180, 0, 0 ) );
Draw an arc.
- $x,$y is the origin of the arc
- $rw and $rh are the horizontal ( $rw - width ) and vertical ( $rh - height ) radius to use when drawing the arc. If $rw and $rh are equal, you will draw the arc of a circle
- $start and $end denote the start and end of the arc in degrees. See the diagram below
- $join is optional. If specified ( $join == 1 ) lines are drawn from the origin to the end points of the arc
- $fill is optional. If specified ( $fill == 1 ) the arc is filled.
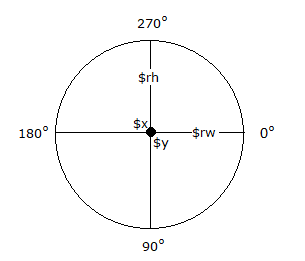
# draw 20 degree arc of a circle at x = 63, y = 15, 10 pixel radius
$epd->draw_arc(63, 15, 10, 10, 350, 10);

# same arc, but draw lines from origin to edges
$epd->draw_arc(63, 15, 10, 10, 350, 10, 1);

# same arc, but filled
$epd->draw_arc(63, 15, 10, 10, 350, 10, 0, 1);
Draw an array of 1 / 0 values as a bitmap.
- $x, $y is the origin to draw at
- $bitarray is a reference to an array defining the points
- $fill is optional but if specified, bits that are 0 in the array will be explicitly written to the buffer. If fill is not specified, only bits that are 1 are explicitly written. Using $fill is usefull if you want to overwrite an area of the buffer that has previously been written to.
# Draw a 'raspberry' starting at x = 10, y = 15
my $bitarray =  [
    [ 0, 0, 0, 0, 0, 0, 0, 0, 0, 0,   0, 0, 0, 0, 0, 0, 0, 0, 0, 0 ],
    [ 0, 0, 0, 1, 1, 1, 1, 0, 0, 0,   0, 0, 0, 1, 1, 1, 1, 0, 0, 0 ],
    [ 0, 0, 1, 0, 0, 0, 0, 1, 0, 0,   0, 0, 1, 0, 0, 0, 0, 1, 0, 0 ],
    [ 0, 0, 1, 0, 1, 1, 0, 0, 1, 0,   0, 1, 0, 0, 1, 1, 0, 1, 0, 0 ],
    [ 0, 0, 1, 0, 0, 0, 1, 0, 1, 0,   0, 1, 0, 1, 0, 0, 0, 1, 0, 0 ],

    [ 0, 0, 0, 1, 0, 0, 0, 0, 0, 1,   1, 0, 0, 0, 0, 0, 1, 0, 0, 0 ],
    [ 0, 0, 0, 0, 1, 1, 1, 0, 0, 0,   0, 0, 0, 1, 1, 1, 0, 0, 0, 0 ],
    [ 0, 0, 0, 0, 0, 0, 1, 0, 0, 0,   0, 0, 0, 1, 0, 0, 0, 0, 0, 0 ],
    [ 0, 0, 0, 0, 1, 1, 0, 0, 0, 1,   1, 0, 0, 0, 1, 1, 0, 0, 0, 0 ],
    [ 0, 0, 0, 1, 0, 0, 0, 0, 1, 0,   0, 1, 0, 0, 0, 0, 1, 0, 0, 0 ],

    [ 0, 0, 1, 0, 0, 1, 1, 0, 0, 1,   1, 0, 0, 1, 1, 0, 0, 1, 0, 0 ],
    [ 0, 0, 1, 0, 1, 0, 0, 1, 0, 0,   0, 0, 1, 0, 0, 1, 0, 1, 0, 0 ],
    [ 0, 1, 0, 0, 1, 0, 0, 1, 0, 0,   0, 0, 1, 0, 0, 1, 0, 0, 1, 0 ],
    [ 0, 1, 0, 0, 0, 1, 1, 0, 0, 1,   1, 0, 0, 1, 1, 0, 0, 0, 1, 0 ],
    [ 0, 1, 0, 0, 0, 0, 0, 0, 1, 0,   0, 1, 0, 0, 0, 0, 0, 0, 1, 0 ],

    [ 0, 1, 0, 0, 1, 1, 0, 0, 1, 0,   0, 1, 0, 0, 1, 1, 0, 0, 1, 0 ],
    [ 0, 0, 1, 0, 1, 0, 1, 0, 0, 1,   1, 0, 0, 1, 0, 1, 0, 1, 0, 0 ],
    [ 0, 0, 1, 0, 0, 1, 1, 0, 0, 0,   0, 0, 0, 1, 1, 0, 0, 1, 0, 0 ],
    [ 0, 0, 0, 1, 0, 0, 0, 0, 0, 1,   1, 0, 0, 0, 0, 0, 1, 0, 0, 0 ],
    [ 0, 0, 0, 0, 1, 1, 0, 0, 1, 0,   0, 1, 0, 0, 1, 1, 0, 0, 0, 0 ],

    [ 0, 0, 0, 0, 0, 0, 1, 1, 0, 0,   0, 0, 1, 1, 0, 0, 0, 0, 0, 0 ],
    [ 0, 0, 0, 0, 0, 0, 0, 0, 1, 1,   1, 1, 0, 0, 0, 0, 0, 0, 0, 0 ],
    [ 0, 0, 0, 0, 0, 0, 0, 0, 0, 0,   0, 0, 0, 0, 0, 0, 0, 0, 0, 0 ],
];

$epd->draw_bit_array( 10, 15, $bitarray );
Draw a circle at origin $x $y using radius $r. If $fill is specified, fill the circle
$epd->draw_circle( 15, 15, 10 );
Write a drawing context to the buffer.
Instead of writing to the buffer directly, you can use drawing methods on a HiPi::Graphics::DrawingContext which can then be written to the buffer using draw_context.
You can draw the same context on the buffer many times. You can rotate all the pixels in a context as you write it to the buffer.
my $ctx = $epd->create_context();
$ctx->draw_text(0,0,'Hello World'. 'SansEPD15');

# write it to the buffer at position 10,20 and rotate it 90 degrees.
$epd->draw_context( 10, 20, $ctx->rotated_context( 90, 0, 0) );

# write it to the buffer at position 100,30 and rotate it 180 degrees.
$epd->draw_context( 100, 30, $ctx->rotated_context( 180, 0, 0) );
Draw an ellipse.
- $x,$y is the origin of the ellipse
- $rw and $rh are the horizontal ( $rw - width ) and vertical ( $rh - height ) radius to use when drawing the $ellipse. If $rw and $rh are equal, you will draw a circle
- $fill is optional. If specified ( $fill == 1 ) the ellipse is filled.
$epd->draw_ellipse(20, 15, 10, 7);
Draw a line between $x1,$y1 and $x2,$y2. $endpoint denotes whether the pixel at $x2,$y2 should be written. The default value for $endpoint is 1 ( true ).
$epd->draw_line( 0, 0, 127, 31);
Set a single pixel to 1 (on) or 0 (off).
$x, $y define the pixel to write. $on can be 1 or 0 ( default 1 )
# set pixel at 0,0 to 'on'
$epd->draw_pixel( 0, 0 );

# set same pixel to 'off'
$epd->draw_pixel( 0, 0, 0 );
Draw a polygon
- $vertices is a reference to an array of points representing the vertices of the polygon. If the final point is not equal to the first point, the polygon will be closed anyway.
- $fill may be optionally set to fill the polygon.
$epd->draw_polygon( [ [41,32],[63,60],[84,32],[78,53],[46,53] ] );
# draw it filled
$epd->draw_polygon( [ [41,32],[63,60],[84,32],[78,53],[46,53] ], 1 );
Draw a rectangle
- $x1, $y1 is the top left of the rectangle
- $x2, $y2 is the bottom right of the rectangle
- $fill can be optionally be specified ( 1 ) to fill the rectangle
$epd->draw_rectangle( 10, 15, 30, 20 );
Draw a rectangle with rounded corners
- $x1, $y1 is the top left of the rectangle
- $x2, $y2 is the bottom right of the rectangle
- $r is the radius to use for the arc that will form the rounded corners. The default value is 4.
- $fill can be optionally be specified ( 1 ) to fill the rectangle
$epd->draw_rounded_rectangle( 10, 15, 30, 20, 5 );
Draw text to the buffer
- $x, $y is the origin for drawing the text. The origin is in the top left corner of the text.
- $text is the text string to be written
- $font can either be a string naming one of the builtin fonts, or a reference to a font object. The default font is Mono10
The method returns the width and height of the text as written to the buffer
my $y = 0;
my( $w, $h ) = $epd->draw_text(0, $y, 'Hello World', 'Sans12');
$y += $h;
( $w, $h ) = $epd->draw_text(0, $y, 'Raspberry Pi', 'Sans12');
$y += $h;
( $w, $h ) = $epd->draw_text(0, $y, 'HiPi Perl', 'Sans12');
Several builtin fonts are provided.
EPD fonts are included intended for use with E-Paper displays but you may use any of the bitmap font types with both OLED and EPaper displays. THE EPD fonts include all the Latin-1 Supplement characters.
- SansEPD15, SansEPD19, SansEPD23, SansEPD28, SansEPD31, SansEPD38, SansEPD50, SansEPD76, SansEPD102
- MonoEPD15, MonoEPD19, MonoEPD23, MonoEPD28, MonoEPD31, MonoEPD38, MonoEPD50, MonoEPD76, MonoEPD102
- SerifEPD15, SerifEPD19, SerifEPD23, SerifEPD28, SerifEPD31, SerifEPD38, SerifEPD50, SerifEPD76, SerifEPD102
The standard fonts include the printable ascii characters and the 'degree' character ( U+00B0 )
- Sans10, Sans12, Sans14, Sans15, Sans19, Sans20, Sans26, Sans33
- Mono10, Mono12, Mono14, Mono15, Mono19, Mono20, Mono26, Mono33
- Serif10, Serif12, Serif14, Serif15, Serif19, Serif20, Serif26, Serif33
There are also extended fonts that include all the Latin-1 Supplement characters
- SansExtended11, SansExtended13, SansExtended15, SansExtended17, SansExtended21, SansExtended23, SansExtended30, SansExtended38
- MonoExtended11, MonoExtended13, MonoExtended15, MonoExtended17, MonoExtended21, MonoExtended23, MonoExtended30, MonoExtended38
- SerifExtended11, SerifExtended13, SerifExtended15, SerifExtended17, SerifExtended21, SerifExtended23, SerifExtended30, SerifExtended38
The fonts are derived from the Bitstream Vera family.
It is expected that many users will need characters outside the builtin range. HiPi includes tools to create your own bitmapped fonts in the same way the builtins were created.
Get the width and height of the text, without writing to the buffer. This can be helpful to work out where to position the text.
# Write the text to the centre of the OLED
my( $w, $h ) = $epd->get_text_extents( 'Raspberry Pi', 'SansEPD15' );
# centre of text
my $x = int(0.5 + ($epd->logical_width - $w) / 2);
my $y = int(0.5 + ($epd->logical_height - $h) / 2);
$epd->draw_text( $x, $y, 'Raspberry Pi', 'SansEPD15' );
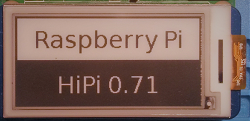
On initial use you may check that your constructor and connections are correct by drawing a simple startup screen.
use HiPi qw( :epaper :rpi );
use HiPi::Interface::EPaper;
my $epd = HiPi::Interface::EPaper->new(
    type       => EPD_WS_2_13_250_X_122_A,
);

$epd->draw_logo;
$epd->display_update;
Examples
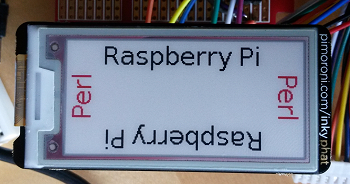
Rotated Text
Use a drawing context to rotate text or other graphics.
#!/usr/bin/perl
use strict;
use warnings;

use HiPi qw( :epaper :rpi );
use HiPi::Interface::EPaper;
my $epd = HiPi::Interface::EPaper->new(
    type     => EPD_PIMORONI_INKY_PHAT_V2,

);

$epd->clear_buffer;

my $ctx = $epd->create_context;

my( $w, $h) = $ctx->draw_text(0,0,'Raspberry Pi', 'SansEPD28');

# Draw all raspberrys & perls in centre

# centre of text
my $cx = int( 0.5 + $w / 2);
my $cy = int( 0.5 + $h / 2);

# draw top line centered
{
    my $x = int(0.5 + ($epd->logical_width - $w) / 2);
    my $y = 0;
    $epd->draw_context( $x, $y, $ctx->rotated_context( 0, 0, 0) );
}

# draw bottom line rotated through 180 about its centre
{
    my $x = int(0.5 + ($epd->logical_width - $w) / 2);
    my $y = $epd->logical_height - $h -1;
    $epd->draw_context( $x, $y, $ctx->rotated_context( 180, $cx, $cy) );
}

$ctx->clear_context;

( $w, $h) = $ctx->draw_text(0,0,'Perl', 'SansEPD28');
$cx = int( 0.5 + $w / 2);
$cy = int( 0.5 + $h / 2);

# Perl in red , if available, otherwise will be black
$epd->set_pen( EPD_RED_PEN );
# Perl right
{
    my $x = $epd->logical_width -1;
    my $y = int( 0.5 + ($epd->logical_height - $w) / 2);
    $epd->draw_context( $x, $y, $ctx->rotated_context( 90, 0, 0 ) );
}

# Perl left
{
    my $x = 0;
    my $y = int( 0.5 + ($w + $epd->logical_height) / 2);
    $epd->draw_context( $x, $y, $ctx->rotated_context( -90, 0, 0 ) );
}
$epd->display_update;
$epd->display_sleep;
1;
Drawing Using Bitmap Images
Any bitmap image loaded from file or created in memory can be used to draw to the display.
Use the image manipulation module of your choice then query the indiviual pixel values to decide which to write to the display.
This example uses Image::Imlib2 to load a red / black image to a display that supports red / black colour.
You could use any functions the image library offers, such as text drawing with TrueType fonts, before applying your filter to the image and writing to the display.
#!/usr/bin/perl
use strict;
use warnings;
use HiPi qw( :epaper );

use HiPi::Interface::EPaper;
use Image::Imlib2;

my $epd = HiPi::Interface::EPaper->new(
    type => EPD_PIMORONI_INKY_PHAT_V2,
);

my $backgroundfile = '/resources/pimoroni/InkyPhat-212x104.png';
my $image = Image::Imlib2->load( $backgroundfile );
my $h = $image->height;
my $w = $image->width;

for (my $y = 0; $y < $h; $y ++) {

    for ( my $x = 0; $x < $w; $x ++) {
        my $pen = undef;
        my($r,$g,$b,$a) = $image->query_pixel($x, $y);
        # filter for black pixels
        if( $r < 50 && $g < 50 && $b < 50 && $a == 255 ) {
            $epd->set_pen(EPD_BLACK_PEN);
            $epd->draw_pixel($x, $y);
        # filter for red pixels
        } elsif( $r > 200 && $g < 50 && $b < 50 && $a == 255 ) {
            $epd->set_pen(EPD_RED_PEN);
            $epd->draw_pixel($x, $y);
        }
    }
}

$epd->display_update;
$epd->display_sleep;

1;
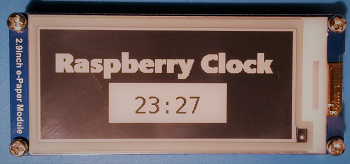
Partial Updates
The example loads the main image from a file. Partial updates are done whenever the minute changes. A full update is done whenever the hour changes. Display specifications suggest displays are fully updated periodically.
#!/usr/bin/perl
use strict;
use warnings;
use HiPi qw( :epaper );

use HiPi::Interface::EPaper;
use Image::Imlib2;

my $epd = HiPi::Interface::EPaper->new(
    type => EPD_WS_2_90_296_X_128_A,
);

# initialise with background bitmap
# populate both display memory areas
# by updating in full mode & partial mode
update_background();
$epd->set_update_mode(EPD_UPD_MODE_PARTIAL);
$epd->display_update();

my $displayed_min = '';
my $displayed_hour = '';
$epd->display_sleep();

while( 1 ) {
    my ($sec, $min, $hour) = localtime(time);
    if( $hour ne $displayed_hour ) {
        # full update once an hour
        # wake up display
        $epd->display_reset;
        $epd->set_update_mode(EPD_UPD_MODE_FULL);
        update_background();
        $epd->set_update_mode(EPD_UPD_MODE_PARTIAL);
        $epd->display_update();
        # and partial
        my $datestamp = sprintf('%02d:%02d', $hour, $min);
        partial_update($datestamp);
        $displayed_hour = $hour;
        $displayed_min = $min;
        # send display to sleep
        $epd->display_sleep;
    } elsif( $min ne $displayed_min ) {
        # wake up display
        $epd->display_reset;
        $epd->set_update_mode(EPD_UPD_MODE_PARTIAL);
        my $datestamp = sprintf('%02d:%02d', $hour, $min);
        partial_update($datestamp);
        $displayed_min = $min;
        # send display to sleep
        $epd->display_sleep;
    }
    sleep 1;
}

sub partial_update {
    my $timestamp = shift;

    # we already know the fixed coordinates
    # of the area we want to partial update

    my $fixed_x = 88;
    my $fixed_y = 72;
    my $fixed_w = 120;
    my $fixed_h = 32;

    # from all our epd font sizes, select the largest that
    # allows the text to fit in the partial update area

    my $timefont;
    my ($tw, $th);

    my $ctx = $epd->create_partial_context( $fixed_w, $fixed_h );
    # our dimensions are multiples of 8, but if they were not,
    # the following adjustment would be necessary
    $fixed_w = $ctx->logical_width;
    $fixed_h = $ctx->logical_height;

    for my $size ( qw( 102 76 50 38 31 28 23 19 15) ) {
        $timefont = 'MonoEPD' . $size;
        ($tw, $th) = $ctx->get_text_extents( $timestamp, $timefont );
        last if $tw < $fixed_w && $th < $fixed_h;
    }

    # get the text in the centre of the partial area
    my $tx = int( 0.5 + ($fixed_w - $tw ) / 2);
    my $ty = int( 0.5 + ($fixed_h - $th ) / 2);

    $ctx->draw_text( $tx, $ty, $timestamp, $timefont);
    $epd->display_partial_update( $fixed_x, $fixed_y, $ctx);
    return;
}


sub update_background {
    $epd->clear_buffer;
    my $backgroundfile = '/resources/hipi/clock296.png';
    my $image = Image::Imlib2->load( $backgroundfile );
    my $h = $image->height;
    my $w = $image->width;

    for (my $y = 0; $y < $h; $y ++) {

        for ( my $x = 0; $x < $w; $x ++) {
            my($r,$g,$b,$a) = $image->query_pixel($x, $y);
            if( $r < 50 && $g < 50 && $b < 50 && $a == 255 ) {
                $epd->draw_pixel($x, $y);
            }
        }
    }

    $epd->display_update;
}

1;